Sync Hestia new mail domain to Proxmox Mail Gateway as Relay Domain

After you successfully imported all Hestia mail domains into your Proxmox Mail Gateway, you might want to sync Hestia to PMG when you add OR delete a mail domain in Hestia as an allowed Relay Domain mail destination on your Proxmox Mail Gateway. Here’s the how-to!

Make sure your Hestia server can establish a trusted SSH connection to the PMG server, using private keys. You can find plenty of guides on how to do so.

On the Hestia server, create the hooks folder and the add domain script:

mkdir /usr/local/hestia/data/hooks/
cd /usr/local/hestia/data/hooks/
vi v-add-mail-domain-after

Enter:

#!/bin/bash
ssh pmg pmgsh create /config/domains --domain "$2" --comment "$1_`date "+%Y-%m-%d"`"

Save and exit vi. This will connect to your PMG server and create the mail domain with the username and creation date in the comment.

Create the delete domain script:

vi v-delete-mail-domain-after

Enter:

#!/bin/bash
ssh pmg pmgsh delete /config/domains/$1

Save and exit vi. This will execute the command and delete the mail domain on the PMG server.

Make the scripts executable:

chmod +x *

Now you need to modify the v-add-mail-domain and v-delete-mail-domain Hestia scripts to execute the hooks.

vi /usr/local/hestia/bin/v-add-mail-domain-after

At the end of the file, before the exit entry, add this:

# Adding new domain to Proxmox Proxy List
/usr/local/hestia/data/hooks/v-add-mail-domain-after $user $domain
$BIN/v-log-action "$user" "Info" "Mail" "Mail relay entry on Proxmox added (Domain: $domain)."

Save and exit vi. This will execute the previously created hook and adds an entry into the user’s log file.

Now for the v-delete-mail-domain command:

vi /usr/local/hestia/bin/v-delete-mail-domain-after

At the end of the file, before the exit entry, add this:

# Delete mail domain from Proxmox Proxy list
sh /usr/local/hestia/data/hooks/v-delete-mail-domain-after $domain
$BIN/v-log-action "$user" "Info" "Mail" "Mail relay entry on Proxmox deleted (Domain: $domain)."

Save and exit vi.

That’s it! Now add your new mail domain and it’ll show up on your Proxmox Mail Gateway. Or delete it 🙂

Export Hestia mail domains into the Relay Domains in Proxmox Mail Gateway 8

See my blogpost about using PMG with Hestia. This is a quick and dirty script to get all Hestia mail domain names for all Hestia users into the Mail Proxy Relay Domains list.

First, on Hestia, export all configured mail domains for all user:

for user in $(v-list-users | awk '{print $1}')
do 
 v-list-mail-domains $user | awk '{print $1}' | grep -v -e 'USER' -e 'DOMAIN' -e '------' -e 'Error:' >> relay_domains.txt
done

Get the relay_domains.txt file to your Proxmox master or node server and run the import:

while IFS= read -r domain 
do
 pmgsh create /config/domains --domain $domain
 echo "Added relay domain: $domain" 
done < relay_domains.txt

Done.

Now you can continue with setting up the mail domains settings as described here.

HestiaCP / Hestia – Batch change mail domain settings for use with Proxmox Mail Gateway

So I have a very cool (and quite full) Hestia server but I do not like the anti-spam capabilities and I wanted to have a reliable incoming and outgoing mail cluster before it. I therefor installed Proxmox Mail Gateway 8 on three nodes to do the filtering. But I have over 20 users and more than 100 mail domains to change.

SO! Batch-mode on.

What I wanted is to disable anti-spam, antivirus and reject spam settings. And also enable the smart relay to use the PMG cluster for outgoing mail.

After importing all mail domain names into Proxmox as ‘relay domains’ (trusted domains for which Proxmox can accept emails), I wrote this script to get all configured mail domains for a Hestia user and change the settings.

Just save it as mailchange.sh, do a chmod +x mailchange.sh and run it with a username:

./mailchange.sh hestia.username

The script:

#!/bin/bash
clear
# Change this to your PMG cluster host and the relay port 
relayhost="relay.domain.com"
relayport="26"
RED="\033[31m"
GREEN="\033[32m"
NORMAL="\033[0;39m"
if [ -z "$1" ]; then
  printf "$RED"
  echo "Error: The first argument must be a valid username."
  printf "$NORMAL"
  exit 1
else
  user="$1"
fi
# Getting all domains for username
v-list-mail-domains $1 | awk '{print $1}' | grep -v -e 'DOMAIN' -e '------' -e 'Error:' > $1_domains.txt
# Showing current mail domain settings
echo ""
printf "$GREEN"
echo Current mail domains and settings
echo ""
printf "$NORMAL"
v-list-mail-domains $1
# You can still get out of here!
echo ""
printf "$RED"
read -p "Ready to change the settings? (yes/no) " yn
case $yn in
yes ) printf "$GREEN";
echo OK, we will proceed;;
no ) echo exiting...;
  printf "$NORMAL";
exit;;
* ) echo invalid response;
exit 1;;
esac
printf "$NORMAL"
while IFS= read -r domain
do
    echo ""
    v-delete-mail-domain-antispam $1 $domain >/dev/null
    v-delete-mail-domain-antivirus $1 $domain >/dev/null
    v-delete-mail-domain-reject $1 $domain >/dev/null
    v-delete-mail-domain-smtp-relay $1 $domain >/dev/null
    v-add-mail-domain-smtp-relay $1 $domain $relayhost "" "" $relayport >/dev/null
    printf "$GREEN"
    echo "Removed settings and added smart relay for domain $domain"
    printf "$NORMAL"
done < $1_domains.txt
echo ""
printf "$GREEN"
echo New mail domains and settings
echo ""
printf "$NORMAL"
v-list-mail-domains $1

Before:

After:

Done!

Hetzner – Proxmox / ESX – Sophos / pfSense additional IP network config – working & solved

Got a root server at Hetzner with 1 extra public IP address (next to the one provided). Wanted to install Debian and Proxmox on it so I can have a cheap Virtual Machine host. You can also install VMware ESX but then you need to ask them to attach a KVM-over-IP unit and didn’t want to bother.

Networking was a bit of a pain but I got it all configured:

– Proxmox is using the first public IP address so you can manage it externally.
– The second public IP address is needed to assign it to Sophos UTM / pfSense or any firewall of your choice.

This firewall will then NAT incoming traffic to your internal VM’s. In this example, 188.45.45.87 is the MAIN public IP address and 188.45.45.81 is the ADDITIONAL one.

Proxmox network config: 

# network interface settings
auto lo
iface lo inet loopback
iface eth0 inet manual
iface eth0 inet6 static
 address 2b01:4g8:140:14d7::2
 netmask 64
 gateway fe80::1
auto vmbr0 ## Public IP address for Proxmox
iface vmbr0 inet static
 address 188.45.45.87
 netmask 255.255.255.192
 gateway 188.45.45.65
 bridge_ports eth0
 bridge_stp off
 bridge_fd 0
auto vmbr1 ## Interface for internal LAN networking
iface vmbr1 inet static
 address 192.168.0.254
 netmask 255.255.255.0
 gateway 192.168.0.1
 bridge_ports none
 bridge_stp off
 bridge_fd 0

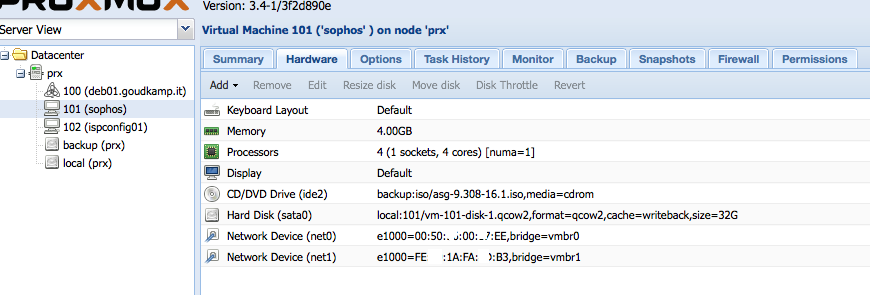
Check if you can reach your Proxmox server on your public IP address. Now, get an additional IP address using Hetzner’s Robot control panel. Once assigned, make sure you request a separate MAC address for the new IP address !!! In this example, 188.45.45.81 has a separate MAC address of 00:50:xx:00:xx:EE

Screen Shot 2015-03-18 at 14.15.12

In Proxmox, create a new VM and assign 2 network cards. One will be used for the LAN (vmbr1) and the other one for the WAN (vmbr0). Screen Shot 2015-03-18 at 14.15.03   The MAC address of the WAN address needs to match the MAC address you’ve requested previously using Hetzner’s Robot ! Screen Shot 2015-03-18 at 14.16.56       To configure your Sophos or pfSense firewall, you’ll need to create a SSH tunnel to the internal IP address of the firewall, as it won’t yet have the additional public IP address configured and probably need to finish the configuration using SSH or a browser. So, use this command (please adjust for your IP settings):

sudo ssh -L 4444:192.168.0.1:4444 root@188.45.45.87

In your browser, navigate to https://localhost:4444/ and finish configuring your firewall. Important: your WAN IP address is the additional IP address. Gateway and netmask are the same as the MAIN IP address.

Enable a DHCP server on your LAN and that’s it! Now you can install your VM’s and get an internal private IP address (as long as you assign vmbr01 in Proxmox to the VM) and use your firewall to NAT outside traffic to the inside.

Postfix smtp relay on OS X Yosemite 10.10

I’m lazy, and for email testing this is great. Who doesn’t need an email relay at some point? As there was no off the shelf solution, here it is for Yosemite.

Define the relay host:
sudo vim /etc/postfix/main.cf
Add section after the existing ‘relayhost’ example:
relayhost = [smtp.gmail.com]:587
smtp_sasl_auth_enable = yes
smtp_sasl_password_maps = hash:/etc/postfix/sasl_passwd
smtp_sasl_security_options = noanonymous
smtp_use_tls = yes
smtp_sasl_mechanism_filter = plain

Add your account for the relay to use.
sudo vim /etc/postfix/sasl_passwd
add:
[smtp.gmail.com]:587 name@somedomain.org:password

Make sure it starts at boot. If you don’t want this, skip this!
sudo vi /System/Library/LaunchDaemons/org.postfix.master.plist
after:
</dict>
add this:
<key>RunAtLoad</key>
<true/>

Finally:
sudo chmod 600 /etc/postfix/sasl_passwd
sudo postmap /etc/postfix/sasl_passwd

Then stop postfix:
sudo launchctl stop org.postfix.master
And start it again (so it reads the config changes):
sudo launchctl start org.postfix.master
sudo postfix start

Check it’s listening:
netstat -an | grep LISTEN | grep 25
It should output something like this:
tcp6 0 0 ::1.25 *.* LISTEN
tcp4 0 0 127.0.0.1.25 *.* LISTEN

You can test it like so:
df -kH | mail -s “contents” your@yourdomain.com

Disclaimer:
1) You can screw your postfix if you don’t pay attention. Be carefull.
2) gmail was used as an example. I’m not endorsed, sponsored or whatever.

This is based on:
Using MacOSX Lion command line mail with Gmail as SMTP
Mac OS X 10.10 Yosemite Postfix SASL authentication failed

How to setup NTPd on OS X

So if you would like to have a Mac acting as a ntp server, the steps are pretty straightforward. This works on all recent client and server versions of OS X.

1) Unload the ntp plist (most definitely needed on the server OS):
launchctl unload /System/Library/LaunchDaemons/org.ntp.ntpd.plist

2) Modify the ntp-restrict.conf
The following lines in the file:
restrict default kod nomodify notrap nopeer noquery
restrict -6 default kod nomodify notrap nopeer noquery
Should become:
restrict default kod nomodify notrap nopeer
restrict -6 default kod nomodify notrap nopeer

Basically the ‘noquery’ needs to be removed.

3) Load the ntp plist.
launchctl load /System/Library/LaunchDaemons/org.ntp.ntpd.plist

That’s it! Piece of raw brownie (better than cake, trust me).
Then modify whatever box that needs an ntp server to point to you freshly modified Mac.

Solved: “[Firmware Bug] ACPI No _BQC method”, initial brightness problem when installing Linux

Tried to install OpenElec and Ubuntu on a mini-ITX Sapphire White system and every time I tried to run the installer, I got a blank screen.
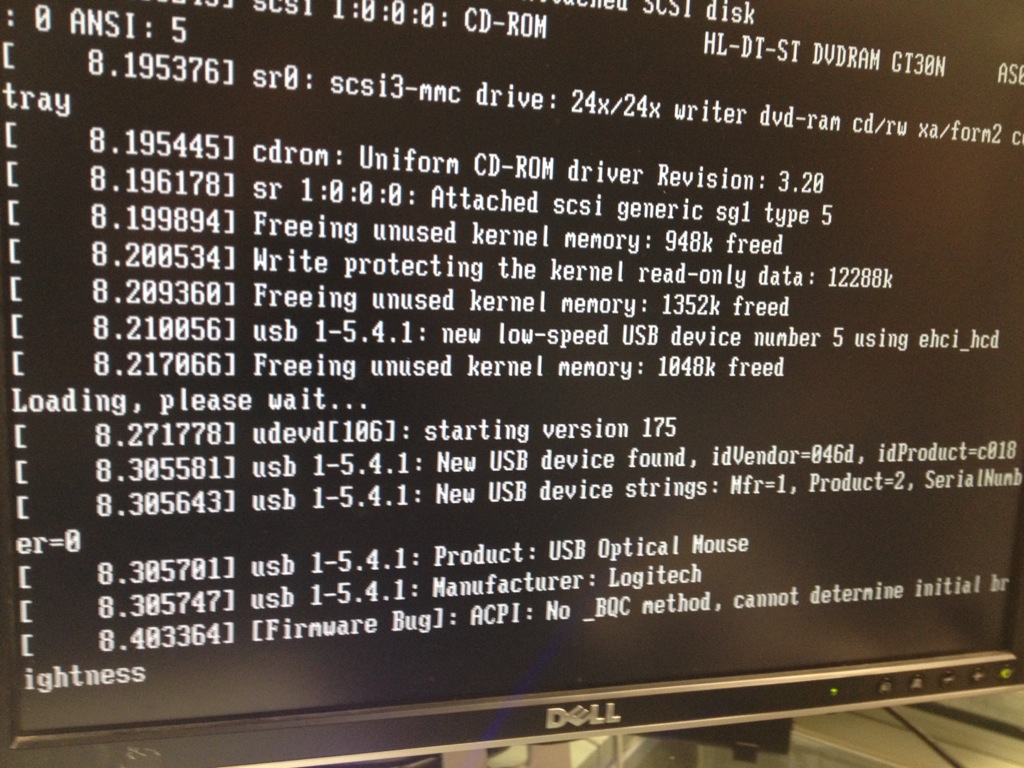
So I booted OpenElec (and Ubuntu) without the ‘quiet’ option from the kernel parameters and I was able to see this error:

[Firmware Bug] ACPI No _BQC method, cannot determine initial brightness

IMG_4599

My system is NOT a laptop so I don’t care about brightness. Searching for a solution on the internet got me nowhere; it involved recompiling kernels but that’s not very useful when I still need to install the Linux distribution.

But I found a solution! Forcing this entry into the kernel parameters while booting the installer:

acpi_backlight=vendor

… it solved my problems! So, OpenElec and Ubuntu are now installing without problems.

BUT, don’t forget to modify your installed distro to reflect the same parameter! If you use OpenElec, you’ll need to manually add the parameter when booting it, SSH into your box and remount the /flash mount as RW (mount -o remount,rw /flash), so you can edit the syslinux.cfg file and add the parameter.

Debian 6 and slow DNS lookup & resolving

Just installed a basic Debian 6 server and was amazed about how much time it took to resolve any domain name; at least 4 seconds. But I found the solution: if you don’t use IPv6 then disable it.

Check the IPv6 alias:

grep ipv6 /etc/modprobe.d/aliases

This should give you this entry:

# alias net-pf-10 ipv6

Edit that file and change the line to:

alias net-pf-10 off ipv6

Then reboot. As always, YMMV.

VNCserver with GParted on headless Ubuntu server

I need to grow a disk on my Ubuntu server but only have SSH access to the machine and need GParted to do that.

Here’s how I’ve done it:

sudo apt-get install vnc4server openbox gparted
vnc4server 
vnc4server -kill :1
sed -i -e 's/x-window-manager/openbox-session/g' ~/.vnc/xstartup
vnc4server

Open port 5901 incoming, and access with a VNC client. Right-click to start the terminal within openbox, and you’ll be able to run any GTK+ apps, including gparted.

Synology DSM 4.1’s VideoStation and DVB-T channels list fix

Tried to get my EyeTV Diversity DVB-T USB stick to work with my Synology DS-1512 and the VideoStation program.
DSM recognises the USB stick but when I tried a channel scan (selecting Country: Italy and Region: Italy), nothing came up.

So, it must be a faulty channel list then. DSM VideoStation uses this list:

/volume1/@appstore/VideoStation/etc/synodvb_t/Italy

and this contains:

# T freq bw fec_hi fec_lo mod transmission-mode guard-interval hierarchy

### VHF - Band III ###
# 5
T 177500000 7MHz 2/3 NONE QAM64 8k 1/32 NONE
# 6
T 184500000 7MHz 2/3 NONE QAM64 8k 1/32 NONE
# 7
T 191500000 7MHz 2/3 NONE QAM64 8k 1/32 NONE
# 8
T 198500000 7MHz 2/3 NONE QAM64 8k 1/32 NONE
# 9
T 205500000 7MHz 2/3 NONE QAM64 8k 1/32 NONE
# 10
T 212500000 7MHz 2/3 NONE QAM64 8k 1/32 NONE
# 11
T 219500000 7MHz 2/3 NONE QAM64 8k 1/32 NONE
# 12
T 226500000 7MHz 2/3 NONE QAM64 8k 1/32 NONE

… etcetera, etcetera. Using this (Italian) channel site http://www.dgtvi.it/copertura.php, I looked up the stations that are available in my are (Monte Fasce) and put them manually in a new file called ‘My Region’:

/volume1/@appstore/VideoStation/etc/synodvb_t/My Region
T 682000000 8MHz AUTO AUTO AUTO AUTO AUTO NONE
T 786000000 8MHz AUTO AUTO AUTO AUTO AUTO NONE
T 642000000 8MHz AUTO AUTO AUTO AUTO AUTO NONE
T 674000000 8MHz AUTO AUTO AUTO AUTO AUTO NONE
T 546000000 8MHz AUTO AUTO AUTO AUTO AUTO NONE
T 514000000 8MHz AUTO AUTO AUTO AUTO AUTO NONE
T 626000000 8MHz AUTO AUTO AUTO AUTO AUTO NONE
T 722000000 8MHz AUTO AUTO AUTO AUTO AUTO NONE
T 594000000 8MHz AUTO AUTO AUTO AUTO AUTO NONE
T 698000000 8MHz AUTO AUTO AUTO AUTO AUTO NONE
T 758000000 8MHz AUTO AUTO AUTO AUTO AUTO NONE

Now, turning back to VideoStation, I was able to select this new region file and WOW: it’s working!
VideoStation is now happily scanning for channels.