Export Hestia mail domains into the Relay Domains in Proxmox Mail Gateway 8

See my blogpost about using PMG with Hestia. This is a quick and dirty script to get all Hestia mail domain names for all Hestia users into the Mail Proxy Relay Domains list.

First, on Hestia, export all configured mail domains for all user:

for user in $(v-list-users | awk '{print $1}')
do 
 v-list-mail-domains $user | awk '{print $1}' | grep -v -e 'USER' -e 'DOMAIN' -e '------' -e 'Error:' >> relay_domains.txt
done

Get the relay_domains.txt file to your Proxmox master or node server and run the import:

while IFS= read -r domain 
do
 pmgsh create /config/domains --domain $domain
 echo "Added relay domain: $domain" 
done < relay_domains.txt

Done.

Now you can continue with setting up the mail domains settings as described here.

HestiaCP / Hestia – Batch change mail domain settings for use with Proxmox Mail Gateway

So I have a very cool (and quite full) Hestia server but I do not like the anti-spam capabilities and I wanted to have a reliable incoming and outgoing mail cluster before it. I therefor installed Proxmox Mail Gateway 8 on three nodes to do the filtering. But I have over 20 users and more than 100 mail domains to change.

SO! Batch-mode on.

What I wanted is to disable anti-spam, antivirus and reject spam settings. And also enable the smart relay to use the PMG cluster for outgoing mail.

After importing all mail domain names into Proxmox as ‘relay domains’ (trusted domains for which Proxmox can accept emails), I wrote this script to get all configured mail domains for a Hestia user and change the settings.

Just save it as mailchange.sh, do a chmod +x mailchange.sh and run it with a username:

./mailchange.sh hestia.username

The script:

#!/bin/bash
clear
# Change this to your PMG cluster host and the relay port 
relayhost="relay.domain.com"
relayport="26"
RED="\033[31m"
GREEN="\033[32m"
NORMAL="\033[0;39m"
if [ -z "$1" ]; then
  printf "$RED"
  echo "Error: The first argument must be a valid username."
  printf "$NORMAL"
  exit 1
else
  user="$1"
fi
# Getting all domains for username
v-list-mail-domains $1 | awk '{print $1}' | grep -v -e 'DOMAIN' -e '------' -e 'Error:' > $1_domains.txt
# Showing current mail domain settings
echo ""
printf "$GREEN"
echo Current mail domains and settings
echo ""
printf "$NORMAL"
v-list-mail-domains $1
# You can still get out of here!
echo ""
printf "$RED"
read -p "Ready to change the settings? (yes/no) " yn
case $yn in
yes ) printf "$GREEN";
echo OK, we will proceed;;
no ) echo exiting...;
  printf "$NORMAL";
exit;;
* ) echo invalid response;
exit 1;;
esac
printf "$NORMAL"
while IFS= read -r domain
do
    echo ""
    v-delete-mail-domain-antispam $1 $domain >/dev/null
    v-delete-mail-domain-antivirus $1 $domain >/dev/null
    v-delete-mail-domain-reject $1 $domain >/dev/null
    v-delete-mail-domain-smtp-relay $1 $domain >/dev/null
    v-add-mail-domain-smtp-relay $1 $domain $relayhost "" "" $relayport >/dev/null
    printf "$GREEN"
    echo "Removed settings and added smart relay for domain $domain"
    printf "$NORMAL"
done < $1_domains.txt
echo ""
printf "$GREEN"
echo New mail domains and settings
echo ""
printf "$NORMAL"
v-list-mail-domains $1

Before:

After:

Done!

Microsoft Teams – Cannot chat with external users

So Microsoft changed things again. This time, it seems you can have a Teams meeting with external users but can’t chat with them, if their account is not company-managed. Here’s the work around for that, in Powershell. Please authenticate with your Tennant as usual and:

Install:
Get-Module -ListAvailable -Name MicrosoftTeams
Install-Module MicrosoftTeams
Connect-MicrosoftTeams
Set:
Set-CSTenantFederationConfiguration -AllowTeamsConsumer:$true
Check:
Get-CSTenantFederationConfiguration

Microsoft 365 – Disable MFA on admin account using PowerShell when locked out

The phone-number associated with the admin account was no longer available so the client couldn’t access the admin portal of Microsoft 365 as the following message popped-up:

“More information required – Your organisation needs more information to keep your account secure”

And there was NO way to get passed that. Total lock-out. So, fire up PowerShell on a Windows machine (PS on a Mac does not work with MSOnline) and copy/paste the following lines to disable MFA and get asked to enter a new phone number! Please change the admin email and password to yours.

Set-ExecutionPolicy RemoteSigned
Install-Module PowershellGet -Force
Install-Module -Name ExchangeOnlineManagement
Import-Module ExchangeOnlineManagement

$secpasswd = ConvertTo-SecureString -String 'SuperSecretPassword' -AsPlainText -Force
$o365cred = New-Object System.Management.Automation.PSCredential ("adminemail@address.com", $secpasswd)
Connect-ExchangeOnline -Credential $o365cred -ShowBanner:$false

Install-Module MSOnline
Import-Module MSOnline
Connect-MsolService -Credential $o365cred

Get-MsolUser -UserPrincipalName adminemail@address.com | Set-MsolUser -StrongAuthenticationMethods @()

Synology DS1511+ fan error: how to disable warning

My old Synology DS1511+ has a failed fan. It gave warnings in the form of beeps and in the logs, which it is supposed to do.

To be honest, I found someone who already had done what I wanted, so I just modified it slightly to work for DS1511+.

What we are going to do:

  1. Enable SSH and connect to our Synology box.
  2. Locate any files named “fan” something.
  3. Use the Editor VI to create a Shell Script to disable the “check_fan” function after each reboot.
    Info: basic VI commands and Vi commands on Synology wiki. We are only going to use the [ESC] key, and the command “:wq!” to exit and save from vi.

Steps to make this Work:

  1. First turn on SSH in Control Panel |Terminal

  2. Connect to your Synology box using a program like Putty where username is “root” and password is the same you use for “admin“.
  3. Locate the file we need to modify in order to disable the fan check.
    Note: if you cant find the file, navigate to sys dir first using cd /sys/

    find -name "*fan*"
    
    Results in:
    ./module/pineview_synobios/parameters/check_fan
  4. Create a Shell script by navigating to the location containing the scripts. Creating a new script file and modify the permissions for the file (do this with sudo):
    cd /usr/syno/etc.defaults/rc.sysv/
    vi S99zz_fan_check_disable.sh
    echo 0 > /sys/module/pineview_synobios/parameters/check_fan
    [ESC]
    :x [Enter]
    chmod +x S99zz_fan_check_disable.sh
  5. That’s it. Reboot your NAS and now you don’t have to modify the file after each reboot.

Genesis-Mining.com 3% discount code (Cloud based Bitcoin and Altcoin mining)

Genesis-Mining, a Scrypt cloud mining contracts company, has opened up their affiliate program for all users. This means that, like with other comparable Bitcoin-related services, you will earn more hashrate by referring people. But there’s more!

In order to refer people to Genesis-Mining, you have to request a special promotional code through their support system.

So what do these referral codes do for the people you bring over to Genesis-Mining? Well, people referred by you will receive a 3% discount on their order total, which is not bad either.

For the referrer, aka us, we get the equivalent of 3% of your purchased hashing power added to our account. For example, if you purchase the Diamond plan through our code, we get 1,5 Mhash/s of free hashing power added to our account, and you get 3% off your order price.

If you are planning to purchase a Genesis-Mining contract, and you really should, use the code “DEB1” , without quotation marks, to receive your 3% discount!

Genesis-Mining website : http://www.Genesis-Mining.com

Promotional code : DEB1 (3% discount)

Hetzner – Proxmox / ESX – Sophos / pfSense additional IP network config – working & solved

Got a root server at Hetzner with 1 extra public IP address (next to the one provided). Wanted to install Debian and Proxmox on it so I can have a cheap Virtual Machine host. You can also install VMware ESX but then you need to ask them to attach a KVM-over-IP unit and didn’t want to bother.

Networking was a bit of a pain but I got it all configured:

– Proxmox is using the first public IP address so you can manage it externally.
– The second public IP address is needed to assign it to Sophos UTM / pfSense or any firewall of your choice.

This firewall will then NAT incoming traffic to your internal VM’s. In this example, 188.45.45.87 is the MAIN public IP address and 188.45.45.81 is the ADDITIONAL one.

Proxmox network config: 

# network interface settings
auto lo
iface lo inet loopback
iface eth0 inet manual
iface eth0 inet6 static
 address 2b01:4g8:140:14d7::2
 netmask 64
 gateway fe80::1
auto vmbr0 ## Public IP address for Proxmox
iface vmbr0 inet static
 address 188.45.45.87
 netmask 255.255.255.192
 gateway 188.45.45.65
 bridge_ports eth0
 bridge_stp off
 bridge_fd 0
auto vmbr1 ## Interface for internal LAN networking
iface vmbr1 inet static
 address 192.168.0.254
 netmask 255.255.255.0
 gateway 192.168.0.1
 bridge_ports none
 bridge_stp off
 bridge_fd 0

Check if you can reach your Proxmox server on your public IP address. Now, get an additional IP address using Hetzner’s Robot control panel. Once assigned, make sure you request a separate MAC address for the new IP address !!! In this example, 188.45.45.81 has a separate MAC address of 00:50:xx:00:xx:EE

Screen Shot 2015-03-18 at 14.15.12

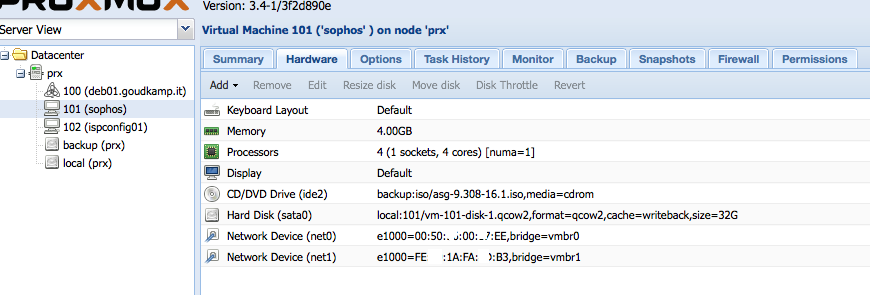
In Proxmox, create a new VM and assign 2 network cards. One will be used for the LAN (vmbr1) and the other one for the WAN (vmbr0). Screen Shot 2015-03-18 at 14.15.03   The MAC address of the WAN address needs to match the MAC address you’ve requested previously using Hetzner’s Robot ! Screen Shot 2015-03-18 at 14.16.56       To configure your Sophos or pfSense firewall, you’ll need to create a SSH tunnel to the internal IP address of the firewall, as it won’t yet have the additional public IP address configured and probably need to finish the configuration using SSH or a browser. So, use this command (please adjust for your IP settings):

sudo ssh -L 4444:192.168.0.1:4444 root@188.45.45.87

In your browser, navigate to https://localhost:4444/ and finish configuring your firewall. Important: your WAN IP address is the additional IP address. Gateway and netmask are the same as the MAIN IP address.

Enable a DHCP server on your LAN and that’s it! Now you can install your VM’s and get an internal private IP address (as long as you assign vmbr01 in Proxmox to the VM) and use your firewall to NAT outside traffic to the inside.

Synology Cloud Station and the pesky TailCharacterConflict error

At my (previous) company we’re using Synology Cloud Station with 20 users and lots of files. One user was complaining that the folder names were renamed with this nice addition:

Company Name B.V._PC_Name_UserName_Jan-27-145750-2015_TailCharacterConflict

Everything I tried didn’t help: renaming the folder, deleting it from the server, resyncing, everything. Google wasn’t a big help either. The folder kept being renamed with this very irritating TailCharacterConflict.

Until I saw the pattern.

You CAN’T let you folder name end with a trailing PERIOD. In this case, the folder name was Company Name B.V.

Changing the folder name to Company Name BV (with the periods) solved the problem. Insane, but true!

Postfix smtp relay on OS X Yosemite 10.10

I’m lazy, and for email testing this is great. Who doesn’t need an email relay at some point? As there was no off the shelf solution, here it is for Yosemite.

Define the relay host:
sudo vim /etc/postfix/main.cf
Add section after the existing ‘relayhost’ example:
relayhost = [smtp.gmail.com]:587
smtp_sasl_auth_enable = yes
smtp_sasl_password_maps = hash:/etc/postfix/sasl_passwd
smtp_sasl_security_options = noanonymous
smtp_use_tls = yes
smtp_sasl_mechanism_filter = plain

Add your account for the relay to use.
sudo vim /etc/postfix/sasl_passwd
add:
[smtp.gmail.com]:587 name@somedomain.org:password

Make sure it starts at boot. If you don’t want this, skip this!
sudo vi /System/Library/LaunchDaemons/org.postfix.master.plist
after:
</dict>
add this:
<key>RunAtLoad</key>
<true/>

Finally:
sudo chmod 600 /etc/postfix/sasl_passwd
sudo postmap /etc/postfix/sasl_passwd

Then stop postfix:
sudo launchctl stop org.postfix.master
And start it again (so it reads the config changes):
sudo launchctl start org.postfix.master
sudo postfix start

Check it’s listening:
netstat -an | grep LISTEN | grep 25
It should output something like this:
tcp6 0 0 ::1.25 *.* LISTEN
tcp4 0 0 127.0.0.1.25 *.* LISTEN

You can test it like so:
df -kH | mail -s “contents” your@yourdomain.com

Disclaimer:
1) You can screw your postfix if you don’t pay attention. Be carefull.
2) gmail was used as an example. I’m not endorsed, sponsored or whatever.

This is based on:
Using MacOSX Lion command line mail with Gmail as SMTP
Mac OS X 10.10 Yosemite Postfix SASL authentication failed

How to setup NTPd on OS X

So if you would like to have a Mac acting as a ntp server, the steps are pretty straightforward. This works on all recent client and server versions of OS X.

1) Unload the ntp plist (most definitely needed on the server OS):
launchctl unload /System/Library/LaunchDaemons/org.ntp.ntpd.plist

2) Modify the ntp-restrict.conf
The following lines in the file:
restrict default kod nomodify notrap nopeer noquery
restrict -6 default kod nomodify notrap nopeer noquery
Should become:
restrict default kod nomodify notrap nopeer
restrict -6 default kod nomodify notrap nopeer

Basically the ‘noquery’ needs to be removed.

3) Load the ntp plist.
launchctl load /System/Library/LaunchDaemons/org.ntp.ntpd.plist

That’s it! Piece of raw brownie (better than cake, trust me).
Then modify whatever box that needs an ntp server to point to you freshly modified Mac.