Download Absinthe 2.0 for Windows, Mac & Linux / Ubuntu [Mirrored SkyDrive links]

Download Absinthe 2.0 for Windows, Mac & Linux / Ubuntu [Mirrored links]

Much awaited untethered 5.1.1 jailbreak has finally been released. You can now download Absinthe 2.0 (Win, Mac & Linux / Ubuntu) versions using the mirrored download links given at the end of the post. Absinthe lets you jailbreak iOS 5.1.1 untethered on following devices:

Absinthe 2.0 Compatible Devices

iPhone 4S, 4, 3GS
iPad 3, iPad 2 and iPad 1
iPod 4G & 3G
Apple TV 2

The only device that is not supported is Apple TV3. It’s the first jailbreak tool that lets you jailbreak iPad 3 iOS 5.1.1. So, the new iPad users can finally rejoice and get their hands on jailbreak goodness. Users with older devices were already able to get tethered jailbreak on iOS 5.1.1, thanks to geohot’s Limera1n exploit. Now when Absinthe 2.0 has been released, you will not need to boot tethered, which is a relief.
Greenpois0n Absinthe is fairly easy to use. We’ll be posting a step by step guide shortly. Stay tuned!

Download Absinthe 2.0 from SkyDrive

OS X: Absinthe-mac-2.0.dmg
Windows: Absinthe-win-2.0.zip
Linux / Ubuntu: Absinthe-linux-2.0.tar.bz2

ClamAV as a service on Windows with Kerio Connect / Mailserver

Do you know how hard it is to install ClamAV as a service, together with Kerio Connect / Mailserver ? I do. Very annoying but since you don’t want to pay for the extra AV option within Kerio Connect / Mailserver, ClamAV could be a nice option. But how. Well, it’s a mix of a bundle of tools. Let me get you started. NOTE: this is NOT the perfect way to install, but it worked for me so YMMV.

1. Install ClamWin Free Antivirus (this doesn’t install the service but it’s an easy way to get the database updates…). Use this path when installing: C:\ClamAV.

2. Download ClamAV for Windows and extract it to C:\ClamAV

3. Create these extra folders:

C:\ClamAV\tmp
C:\ClamAV\db

4. Modify the Antivirus Database download folder in ClamWin Free Antivirus to point it to C:\ClamAV\db and update the DB.
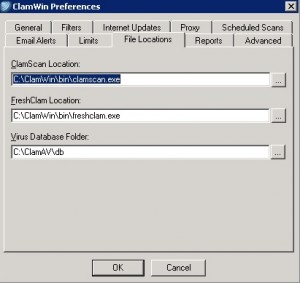


5. Paste the Kerio Connect / Mailserver ClamAV config to C:\ClamAV\clamd.conf

PidFile C:\ClamAV\clamd.pid
LogFile C:\ClamAV\clamd.log
DatabaseDirectory C:\ClamAV\db
TemporaryDirectory C:\ClamAV\tmp
TCPSocket 3310
TCPAddr 127.0.0.1
DetectPUA yes
DetectBrokenExecutables yes
HeuristicScanPrecedence yes
ArchiveBlockEncrypted yes
StreamMaxLength 30M

6. Now for the tricky part: running clamd.exe as a service (clamd.exe –install didn’t work for me). You’ll need the Windows Resource kit for your server; mine is a Windows 2003 box. Get it here : Windows Server 2003 Resource Kit Tools and copy / move instsrv.exe and srvany.exe in the same directory of ClamAV (C:\ClamAV).

6. Goto DOS prompt (cmd) and go to C:\ClamAV. Enter:

instsrv.exe clamD c:\ClamAV\srvany.exe

7. Now edit the registry to let clamd.exe run using it’s clamd.conf file when started as a service.

NOTE: It is dangerous to edit the registry, follow carefully

  • Navigate to HKEY_LOCAL_MACHINE\System\CurrentControlSet\Services\clamD
  • Right click on clamd and create a new Key called Parameters
  • Right click on Parameters and create a new String Value called Application
  • Edit the new Application REG_SZ and add c:\ClamAV\clamd.exe -c c:\ClamAV\clamd.conf

8. Then you can start and stop clamD in Services or manually:

net start clamD

You can check if clamav is listening at the right port:

netstat -a | findstr 3310

9. Time to tell Kerio Connect / Mailserver that we have a running ClamAV daemon, ready to answer all AV questions:

  1. Open the Kerio Connect’s Administration
  2. Go to Configuration->Content Filter->Antivirus
  3. Enable option “Use external antivirus” (near the top)
  4. Choose “Clam Antivirus”
  5. Click “Apply” (near the bottom) to save settings

And that’s it !


Mount and format exFAT disks in Ubuntu

In this guide, I’ll show you how to enable exFAT support in Ubuntu 10.04 – 11.10 (12.04 might work too, didn’t test it):

Open your terminal and enter:

sudo add-apt-repository ppa:relan/exfat
sudo apt-get update
sudo apt-get install exfat-utils fuse-exfat

That’s it. To get auto-mount support, use these procedures for 32bit or 64bit:

sudo apt-get -y install ncurses-dev
wget http://mirror.gbxs.net/pub/linux/utils/util-linux-ng/v2.18/util-linux-ng-2.18.tar.bz2
tar xf util-linux-ng-2.18.tar.bz2
cd util-linux-ng-2.18
./configure
make

Now follow these steps if you have a 32bit system:

sudo mv /lib/libblkid.so.1.1.0 /lib/libblkid.so.1.1.0.backup
sudo cp shlibs/blkid/src/.libs/libblkid.so.1.1.0 /lib/
sudo chmod 644 /lib/libblkid.so.1.1.0
sudo rm /lib/libblkid.so.1
sudo ln -s /lib/libblkid.so.1.1.0 /lib/libblkid.so.1

or these for 64bit:

sudo mv /lib64/libblkid.so.1.1.0 /lib64/libblkid.so.1.1.0.backup
sudo cp shlibs/blkid/src/.libs/libblkid.so.1.1.0 /lib64/
sudo chmod 644 /lib/libblkid.so.1.1.0
sudo rm /lib/libblkid.so.1
sudo ln -s /lib/libblkid.so.1.1.0 /lib/libblkid.so.1

Now connect your disk or remount it. And you’ll should see your exFAT disk!

Some extra commands:

To format a exFAT partition:
sudo mkfs.exfat -n LABEL /dev/sdXn
or
sudo mkexfatfs -n LABEL /dev/sdXn

To change the label:
sudo exfatlabel /dev/sdXn NEW_LABEL

Get filesystem info:
sudo dumpexfat /dev/sdXn

To check the partition:
sudo fsck.exfat /dev/sdXn
or
sudo exfatfsck /dev/sdXn