Microsoft 365 – Disable MFA on admin account using PowerShell when locked out

The phone-number associated with the admin account was no longer available so the client couldn’t access the admin portal of Microsoft 365 as the following message popped-up:

“More information required – Your organisation needs more information to keep your account secure”

And there was NO way to get passed that. Total lock-out. So, fire up PowerShell on a Windows machine (PS on a Mac does not work with MSOnline) and copy/paste the following lines to disable MFA and get asked to enter a new phone number! Please change the admin email and password to yours.

Set-ExecutionPolicy RemoteSigned
Install-Module PowershellGet -Force
Install-Module -Name ExchangeOnlineManagement
Import-Module ExchangeOnlineManagement

$secpasswd = ConvertTo-SecureString -String 'SuperSecretPassword' -AsPlainText -Force
$o365cred = New-Object System.Management.Automation.PSCredential ("adminemail@address.com", $secpasswd)
Connect-ExchangeOnline -Credential $o365cred -ShowBanner:$false

Install-Module MSOnline
Import-Module MSOnline
Connect-MsolService -Credential $o365cred

Get-MsolUser -UserPrincipalName adminemail@address.com | Set-MsolUser -StrongAuthenticationMethods @()

SkyCity 802.11n USB 2.0 driver for Windows

Bought a very cheap DealExtreme WiFi USB adapter with this info:

Driver Information for Realtek RTL8188CU Wireless LAN 802.11n USB 2.0 Network Adapter / ECS H61H2-M3
Device Name
Realtek RTL8188CU Wireless LAN 802.11n USB 2.0 Network Adapter
Hardware ID
USB\VID_0BDA&PID_8176&REV_0200
USB\VID_0BDA&PID_8176 <—- Device ID matches with our database

Compatible IDs:
USB\CLASS_FF&SUBCLASS_FF&PROT_FF
USB\CLASS_FF&SUBCLASS_FF
USB\CLASS_FF

Version
1006.1.713.2010,2010-07-13
Device Type
net
Driver Version
1015.6.210.2012
OS Support
2K,XP,2K3,VISTA,WIN7,WIN8/32bits
Driver Date
2012-02-10
Manufacturer
Realtek Semiconductor Corp.

And finally found a working Windows driver:

http://www1.medion.de/downloads/index.pl?op=detail&id=11727&type=treiber&lang=us

Just wanted to share 🙂

Disable BitLocker on Windows (perhaps for a HW change)

In a tight spot with BitLocker on your Windows system?
For example wanting to do a hardware change(s) to your system?
Become IT dept independent!

Disable BitLocker, do your changes, and turn it back on.

Please note : You will need an admin shell – not God mode, just a ‘run as admin’ dos box.

1) In the shell type:

 manage-bde -protectors -disable C:

2) Do the changes.

3) Turn it back on:

 manage-bde -protectors -enable C:

Thats it. YMMV
This is also a decent resource:
http://technet.microsoft.com/en-us/library/dd875513(v=ws.10).aspx

Windows 2008 R2 Server & Windows 7 Pro: Unidentified network unchangeable

After installing Windows 2008 R2 inside VMware, I changed the network driver from E1000 to VMNET3. No problem, Windows 2008 R2 recognized the new adapters after a reboot. I only had to change the DHCP IP address to fixed IP. And then the problems started: apparently Windows 2008 (or Windows 7) won’t let you change the network location as soon as it has put the network in the ‘Unidentified network’ category. Trying ‘to fix’ this problem using the Windows ‘Diagnose’ tool just removed the fixed IP address and put it back on DHCP (and strangely, now the network category is Public).

This, of course, sucks.

However, this little trick should work:

1. Start –> run –> MMC –> press enter

2. In MMC console , from menu file select Add/Remove Snap-in

3. Select Group Policy Object editor –> Press Add –> select Local computer –> press OK –>press OK

4. Open Computer configration –>Windows Settings –>Security Settings –>select Network list manager policies

5. Double click –>Unidentified networks

Then you can select the option to consider the Unidentified networks as private.

This worked for me !

ClamAV as a service on Windows with Kerio Connect / Mailserver

Do you know how hard it is to install ClamAV as a service, together with Kerio Connect / Mailserver ? I do. Very annoying but since you don’t want to pay for the extra AV option within Kerio Connect / Mailserver, ClamAV could be a nice option. But how. Well, it’s a mix of a bundle of tools. Let me get you started. NOTE: this is NOT the perfect way to install, but it worked for me so YMMV.

1. Install ClamWin Free Antivirus (this doesn’t install the service but it’s an easy way to get the database updates…). Use this path when installing: C:\ClamAV.

2. Download ClamAV for Windows and extract it to C:\ClamAV

3. Create these extra folders:

C:\ClamAV\tmp
C:\ClamAV\db

4. Modify the Antivirus Database download folder in ClamWin Free Antivirus to point it to C:\ClamAV\db and update the DB.
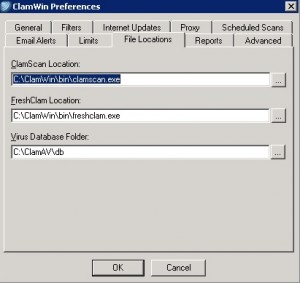


5. Paste the Kerio Connect / Mailserver ClamAV config to C:\ClamAV\clamd.conf

PidFile C:\ClamAV\clamd.pid
LogFile C:\ClamAV\clamd.log
DatabaseDirectory C:\ClamAV\db
TemporaryDirectory C:\ClamAV\tmp
TCPSocket 3310
TCPAddr 127.0.0.1
DetectPUA yes
DetectBrokenExecutables yes
HeuristicScanPrecedence yes
ArchiveBlockEncrypted yes
StreamMaxLength 30M

6. Now for the tricky part: running clamd.exe as a service (clamd.exe –install didn’t work for me). You’ll need the Windows Resource kit for your server; mine is a Windows 2003 box. Get it here : Windows Server 2003 Resource Kit Tools and copy / move instsrv.exe and srvany.exe in the same directory of ClamAV (C:\ClamAV).

6. Goto DOS prompt (cmd) and go to C:\ClamAV. Enter:

instsrv.exe clamD c:\ClamAV\srvany.exe

7. Now edit the registry to let clamd.exe run using it’s clamd.conf file when started as a service.

NOTE: It is dangerous to edit the registry, follow carefully

  • Navigate to HKEY_LOCAL_MACHINE\System\CurrentControlSet\Services\clamD
  • Right click on clamd and create a new Key called Parameters
  • Right click on Parameters and create a new String Value called Application
  • Edit the new Application REG_SZ and add c:\ClamAV\clamd.exe -c c:\ClamAV\clamd.conf

8. Then you can start and stop clamD in Services or manually:

net start clamD

You can check if clamav is listening at the right port:

netstat -a | findstr 3310

9. Time to tell Kerio Connect / Mailserver that we have a running ClamAV daemon, ready to answer all AV questions:

  1. Open the Kerio Connect’s Administration
  2. Go to Configuration->Content Filter->Antivirus
  3. Enable option “Use external antivirus” (near the top)
  4. Choose “Clam Antivirus”
  5. Click “Apply” (near the bottom) to save settings

And that’s it !