Got a root server at Hetzner with 1 extra public IP address (next to the one provided). Wanted to install Debian and Proxmox on it so I can have a cheap Virtual Machine host. You can also install VMware ESX but then you need to ask them to attach a KVM-over-IP unit and didn’t want to bother.
Networking was a bit of a pain but I got it all configured:
– Proxmox is using the first public IP address so you can manage it externally.
– The second public IP address is needed to assign it to Sophos UTM / pfSense or any firewall of your choice.
This firewall will then NAT incoming traffic to your internal VM’s. In this example, 188.45.45.87 is the MAIN public IP address and 188.45.45.81 is the ADDITIONAL one.
Proxmox network config:Â
# network interface settings
auto lo
iface lo inet loopback
iface eth0 inet manual
iface eth0 inet6 static
 address 2b01:4g8:140:14d7::2
 netmask 64
 gateway fe80::1
auto vmbr0 ## Public IP address for Proxmox
iface vmbr0 inet static
 address 188.45.45.87
 netmask 255.255.255.192
 gateway 188.45.45.65
 bridge_ports eth0
 bridge_stp off
 bridge_fd 0
auto vmbr1 ## Interface for internal LAN networking
iface vmbr1 inet static
 address 192.168.0.254
 netmask 255.255.255.0
 gateway 192.168.0.1
 bridge_ports none
 bridge_stp off
 bridge_fd 0
Check if you can reach your Proxmox server on your public IP address. Now, get an additional IP address using Hetzner’s Robot control panel. Once assigned, make sure you request a separate MAC address for the new IP address !!! In this example, 188.45.45.81 has a separate MAC address of 00:50:xx:00:xx:EE
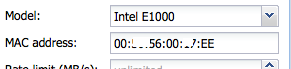
In Proxmox, create a new VM and assign 2 network cards. One will be used for the LAN (vmbr1) and the other one for the WAN (vmbr0). 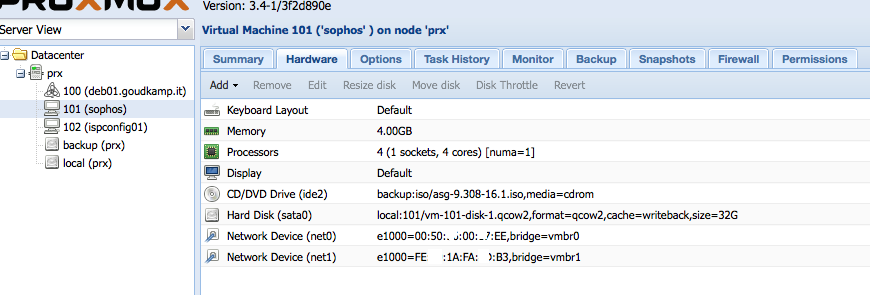 Â The MAC address of the WAN address needs to match the MAC address you’ve requested previously using Hetzner’s Robot !
 The MAC address of the WAN address needs to match the MAC address you’ve requested previously using Hetzner’s Robot ! 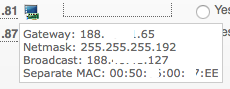    To configure your Sophos or pfSense firewall, you’ll need to create a SSH tunnel to the internal IP address of the firewall, as it won’t yet have the additional public IP address configured and probably need to finish the configuration using SSH or a browser. So, use this command (please adjust for your IP settings):
sudo ssh -L 4444:192.168.0.1:4444 root@188.45.45.87
In your browser, navigate to https://localhost:4444/ and finish configuring your firewall. Important: your WAN IP address is the additional IP address. Gateway and netmask are the same as the MAIN IP address.
Enable a DHCP server on your LAN and that’s it! Now you can install your VM’s and get an internal private IP address (as long as you assign vmbr01 in Proxmox to the VM) and use your firewall to NAT outside traffic to the inside.