HP Smart Array RAID management on ESXi 5 – hpacucli

I’ve got a nice ESXi 5 whitebox with a HP P400 RAID controller wich I would like to configure and monitor. But, HP won’t let you install there software if the Hardware Vendor ID is not from HP. You’ll get errors like this when try to install:

/tmp # esxcli software vib install -f -v /tmp/hpacucli-9.10-22.0.vib
[NoMatchError]
BIOS vendor HP is required but host BIOS vendor is To Be Filled By O.E.M.
BIOS vendor Hewlett-Packard Company is required but host BIOS vendor is To Be Filled By O.E.M.
BIOS vendor Hewlett-Packard is required but host BIOS vendor is To Be Filled By O.E.M.
BIOS vendor hp is required but host BIOS vendor is To Be Filled By O.E.M.
id = (Updated) ESXi-5.0.0-20120302001-standard
Please refer to the log file for more details.

There are tips on the internet where you can download the software, un-7Zip the .vib, modify the descriptor.xml by removing any hardware reference to HP, recreate the .deb package, move it to the ESXi server, renaming it to .vib and voilà, a lot of work later you installed the tool.

Or just get my pre-modified package and install 🙂

Download, scp to your server, ssh into your server and run:

esxcli software vib install -f -v /tmp/hpacucli-9.10-22.0-esxi_mod.vib

VMware ESXi 5 and LSI1068E controller crap

Had lots of problems using my IBM BR10i and Dell SAS 5I/r controllers; performance under ESXi 5 was terrible.
Just 3.5 MB/s on write. Under Linux, write performance was around 110-120 MB/s. So WTF ?

I thought that all this was needed (disable Interrupt Routing):

# esxcli system settings kernel list -o iovDisableIR
# esxcfg-advcfg -k TRUE iovDisableIR (just the above command wasn't enough)
# auto-backup.sh
# auto-backup.sh (yes, twice!)
# reboot

Check:

# esxcfg-advcfg -j iovDisableIR
# esxcli system settings kernel list -o iovDisableIR


But in the end, this wasn’t it. Seems that LSI1068E based controllers disable all disk caching built into the drives by default.

If the server has battery backup you can enable basic drive caching on the Logical Volumes without risk (or, without a battery, WITH risk).

Goto www.LSI.com (The controller is made by LSI) and download and install MegaRAID Storage Manager. In short, install the VIB on your ESXi machine, the Manager on a Windows or Linux machine, sync their host names and enable all ports on the ESXi firewall for incoming TCP traffic.

Highlight the Virtual Raid Volume, right click, properties. Enable Cache and save. You have to do this on every logical raid volume.

Your performance difference is incredible.

And I just lost a day of looking for the solution. Crap.

Publish the Daily Garfield on Facebook shell script

For years now, I’m posting the daily Garfield and Dilbert comic on my Facebook page.

This is the (clumsy) script that does that:

#!/bin/sh
URLBASE="http://comics.kamens.brookline.ma.us/cgi-bin/comics?which=specified&Garfield=include&specified=Garfield&numdays=1&width=&height=&noheaders=on&reload=reload"
wget -O page.html -erobots=off ${URLBASE}/
IMGURL=`grep "assets.amuniversal.com" page.html | awk -F'"' '{print $8}' | head -1`
wget -O garfield.gif ${IMGURL}
./mail.pl garfield.gif your-mobile-FB-emailaddress "Daily Garfield"
rm -rf page.html && rm -rf garfield.gif

Since I don’t want to use Mutt or sendmail, I’m using perl and Mail::Sender:

Mail.pl:

#!/usr/bin/perl -w
# Usage: ./mail.pl attachment to-address subject
my $file = $ARGV[0];
my $tolist = $ARGV[1];
my $subject = $ARGV[2];
my $datum= `date "+%d-%m-%Y"`; # optional
use Mail::Sender;
$sender = new Mail::Sender;if ($sender->MailFile({ 
smtp => 'localhost', 
from => 'fromuser@domain.com', 
to => "$tolist", 
subject => "$subject - $datum", 
msg => " ", 
file => "$file", 
}) < 0) { 
die "$Mail::Sender::Error\n"; 
} 
print "Mail sent OK.\n";

As always, YMMV.

CouchPotato and beta.nzbs.org fix!

Crap, for some weeks I wasn’t able to get CouchPotato use Nzbs.org for searching the NZB’s in the queue. Seems that CouchPotato can’t use the new beta version of nzbs.org and/or can communicate using the new api.

NOTE: this is a fix fot the ORIGINAL version of CouchPotato, not the new V2 / CouchPotatoServer.

To fix this, replace 3 files in your (Linux) CouchPotato installation folder; in this example I’m using my folder structure:

nzbs.py in /opt/couchpotato/app/lib/provider/yarr/sources/
base.py in /opt/couchpotato/app/lib/provider/yarr/
rss.py in /opt/couchpotato/app/lib/provider/

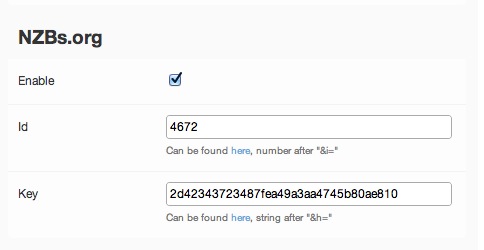
Now, fill in your beta access info (you can find that using the RSS page: http://beta.nzbs.org/rss) into the Provider page of CouchPotato.
The ID and code are NOT the same as the ones you can find in the ‘classic’ pages!

For example: &i=4672&r=2d42343723487fea49a3aa4745b80ae810

Save and restart CouchPotato! All should be ok now!

Download Absinthe 2.0 for Windows, Mac & Linux / Ubuntu [Mirrored SkyDrive links]

Download Absinthe 2.0 for Windows, Mac & Linux / Ubuntu [Mirrored links]

Much awaited untethered 5.1.1 jailbreak has finally been released. You can now download Absinthe 2.0 (Win, Mac & Linux / Ubuntu) versions using the mirrored download links given at the end of the post. Absinthe lets you jailbreak iOS 5.1.1 untethered on following devices:

Absinthe 2.0 Compatible Devices

iPhone 4S, 4, 3GS
iPad 3, iPad 2 and iPad 1
iPod 4G & 3G
Apple TV 2

The only device that is not supported is Apple TV3. It’s the first jailbreak tool that lets you jailbreak iPad 3 iOS 5.1.1. So, the new iPad users can finally rejoice and get their hands on jailbreak goodness. Users with older devices were already able to get tethered jailbreak on iOS 5.1.1, thanks to geohot’s Limera1n exploit. Now when Absinthe 2.0 has been released, you will not need to boot tethered, which is a relief.
Greenpois0n Absinthe is fairly easy to use. We’ll be posting a step by step guide shortly. Stay tuned!

Download Absinthe 2.0 from SkyDrive

OS X: Absinthe-mac-2.0.dmg
Windows: Absinthe-win-2.0.zip
Linux / Ubuntu: Absinthe-linux-2.0.tar.bz2

Mount and format exFAT disks in Ubuntu

In this guide, I’ll show you how to enable exFAT support in Ubuntu 10.04 – 11.10 (12.04 might work too, didn’t test it):

Open your terminal and enter:

sudo add-apt-repository ppa:relan/exfat
sudo apt-get update
sudo apt-get install exfat-utils fuse-exfat

That’s it. To get auto-mount support, use these procedures for 32bit or 64bit:

sudo apt-get -y install ncurses-dev
wget http://mirror.gbxs.net/pub/linux/utils/util-linux-ng/v2.18/util-linux-ng-2.18.tar.bz2
tar xf util-linux-ng-2.18.tar.bz2
cd util-linux-ng-2.18
./configure
make

Now follow these steps if you have a 32bit system:

sudo mv /lib/libblkid.so.1.1.0 /lib/libblkid.so.1.1.0.backup
sudo cp shlibs/blkid/src/.libs/libblkid.so.1.1.0 /lib/
sudo chmod 644 /lib/libblkid.so.1.1.0
sudo rm /lib/libblkid.so.1
sudo ln -s /lib/libblkid.so.1.1.0 /lib/libblkid.so.1

or these for 64bit:

sudo mv /lib64/libblkid.so.1.1.0 /lib64/libblkid.so.1.1.0.backup
sudo cp shlibs/blkid/src/.libs/libblkid.so.1.1.0 /lib64/
sudo chmod 644 /lib/libblkid.so.1.1.0
sudo rm /lib/libblkid.so.1
sudo ln -s /lib/libblkid.so.1.1.0 /lib/libblkid.so.1

Now connect your disk or remount it. And you’ll should see your exFAT disk!

Some extra commands:

To format a exFAT partition:
sudo mkfs.exfat -n LABEL /dev/sdXn
or
sudo mkexfatfs -n LABEL /dev/sdXn

To change the label:
sudo exfatlabel /dev/sdXn NEW_LABEL

Get filesystem info:
sudo dumpexfat /dev/sdXn

To check the partition:
sudo fsck.exfat /dev/sdXn
or
sudo exfatfsck /dev/sdXn

Adding ssh-id-copy to OSX !

There’s a very convenient shell script bundled with some distributions of OpenSSH called ssh-copy-id. It seems not to be the case with Leopard’s or Lion’s SSH.
In order to get it, we can simply check it out of a GIT repository. Execute these two commands:

sudo curl 'https://raw.github.com/gist/1639381/eea46277ba544fcbd0a0768e8b3f854880ddb772/ssh-copy-id' -o /usr/bin/ssh-copy-id
sudo chmod +x /usr/bin/ssh-copy-id

Now execute ssh-id-copy like this:

MBP:~ martijn$ ssh-copy-id root@192.168.0.7
Now try logging into the machine, with "ssh 'root@192.168.0.7'", and check in:

~/.ssh/authorized_keys

to make sure we haven't added extra keys that you weren't expecting.

Loading drivers in ESXi 5.0

So I upgraded to 5 from 4.1 – Cool. Almost. Vanilla install had no support for my Promise SuperTrak EX-8654 card which I have in my HP MircoServer. Now what?!?!?
Well, after a lot of searches, the solution was actually on the Promise site! Yay for them!

So in short an example of you to load a driver on esxi 5.0.

1) Enable ssh access on your esxi 5 host (what do you mean you’ve already done that? It’s dangerous!)

2) Get you driver. The 8654 driver I got from the Promise support site was called 'scsi-stex-4.07.0000.75-1OEM.500.0.0.472560.x86_64.vib'. Yep, what’s in a name.

3) Copy over the driver to the host using scp
ex: scp <driver name> root@<esxi_5_host_ip>:/tmp

4) Next ssh to the esxi host, go to /tmp

5) Install the driver
esxcli software vib install -v /tmp/<driver name>

6) Reload the esxi host – Oh I hand’t told you? Well you need the driver right?

7) Then ssh to the esxi host and check if the driver loaded with 'esxcli software vib list'
In my specific case it looked like this:

~ # esxcli software vib list
Name        Version                             Vendor   Acceptance Level  Install Date
----------  ----------------------------------  -------  ----------------  ------------
scsi-stex   4.07.0000.75-1OEM.500.0.0.472560    Promise  VMwareCertified   2011-12-26

8) Sit back and enjoy the fact you have access to the disks again for adding as a datastore.

Adding a non-VMFS drive to your ESX(i) server and use it!

I had some spare Windows drives lying around and wanted to put them in my HP MicroServer running ESXi 4.1.

After installing the SATA drive, and rebooting, I tried to simply add the drive in the vSphere console. No love from VMWare — I got the message, “Error while adding drive – disk not available.” Hmmm. I was sure the drive was working.

Turns out that in ESXi, once a disk has been written to, in any format, it won’t initialize.
Here’s what it took to add the drive in:

Low-level formatted the drive (the name of the drive might be shorter or longer):
~ # dd if=/dev/zero of=/vmfs/devices/disks/t10.ATA_ST3500413AS_Z2A3TKQ6 bs=512 conv=notrunc

Try adding the disk to your datastore now; I canceled this command after waiting 5 minutes and noticed that ESXi now saw the disk as a ‘blank disk’. Adding it to my datastore now worked! If not, continue…

Recreate the partition table:
~ # fdisk /vmfs/devices/disks/t10.ATA_ST3500413AS_Z2A3TKQ6

Then ‘o’ to Create a new empty DOS partition table
Then ‘n’ to add a new partition. I used Primary as the type, and 1 as the partition number.
Then ‘t’ to change the type. ‘fb’ is the code for VMFS 3.0
Then ‘w’ to write everything to the drive

Finally, use the ‘vmkfstools’ program to create the volume. I added it as a new datastore using the following command:
~ # vmkfstools -C vmfs3 -S Datastore2 /vmfs/devices/disks/t10.ATA_ST3500413AS_Z2A3TKQ6

As always, YMMV.