About Martino

Dutch. Married. Dad. Living in Italy. Apple fan. Owner of ZenaConsult

ClamAV as a service on Windows with Kerio Connect / Mailserver

Do you know how hard it is to install ClamAV as a service, together with Kerio Connect / Mailserver ? I do. Very annoying but since you don’t want to pay for the extra AV option within Kerio Connect / Mailserver, ClamAV could be a nice option. But how. Well, it’s a mix of a bundle of tools. Let me get you started. NOTE: this is NOT the perfect way to install, but it worked for me so YMMV.

1. Install ClamWin Free Antivirus (this doesn’t install the service but it’s an easy way to get the database updates…). Use this path when installing: C:\ClamAV.

2. Download ClamAV for Windows and extract it to C:\ClamAV

3. Create these extra folders:

C:\ClamAV\tmp
C:\ClamAV\db

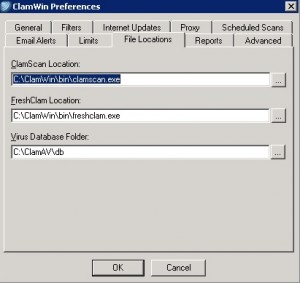
4. Modify the Antivirus Database download folder in ClamWin Free Antivirus to point it to C:\ClamAV\db and update the DB.


5. Paste the Kerio Connect / Mailserver ClamAV config to C:\ClamAV\clamd.conf

PidFile C:\ClamAV\clamd.pid
LogFile C:\ClamAV\clamd.log
DatabaseDirectory C:\ClamAV\db
TemporaryDirectory C:\ClamAV\tmp
TCPSocket 3310
TCPAddr 127.0.0.1
DetectPUA yes
DetectBrokenExecutables yes
HeuristicScanPrecedence yes
ArchiveBlockEncrypted yes
StreamMaxLength 30M

6. Now for the tricky part: running clamd.exe as a service (clamd.exe –install didn’t work for me). You’ll need the Windows Resource kit for your server; mine is a Windows 2003 box. Get it here : Windows Server 2003 Resource Kit Tools and copy / move instsrv.exe and srvany.exe in the same directory of ClamAV (C:\ClamAV).

6. Goto DOS prompt (cmd) and go to C:\ClamAV. Enter:

instsrv.exe clamD c:\ClamAV\srvany.exe

7. Now edit the registry to let clamd.exe run using it’s clamd.conf file when started as a service.

NOTE: It is dangerous to edit the registry, follow carefully

  • Navigate to HKEY_LOCAL_MACHINE\System\CurrentControlSet\Services\clamD
  • Right click on clamd and create a new Key called Parameters
  • Right click on Parameters and create a new String Value called Application
  • Edit the new Application REG_SZ and add c:\ClamAV\clamd.exe -c c:\ClamAV\clamd.conf

8. Then you can start and stop clamD in Services or manually:

net start clamD

You can check if clamav is listening at the right port:

netstat -a | findstr 3310

9. Time to tell Kerio Connect / Mailserver that we have a running ClamAV daemon, ready to answer all AV questions:

  1. Open the Kerio Connect’s Administration
  2. Go to Configuration->Content Filter->Antivirus
  3. Enable option “Use external antivirus” (near the top)
  4. Choose “Clam Antivirus”
  5. Click “Apply” (near the bottom) to save settings

And that’s it !


Mount and format exFAT disks in Ubuntu

In this guide, I’ll show you how to enable exFAT support in Ubuntu 10.04 – 11.10 (12.04 might work too, didn’t test it):

Open your terminal and enter:

sudo add-apt-repository ppa:relan/exfat
sudo apt-get update
sudo apt-get install exfat-utils fuse-exfat

That’s it. To get auto-mount support, use these procedures for 32bit or 64bit:

sudo apt-get -y install ncurses-dev
wget http://mirror.gbxs.net/pub/linux/utils/util-linux-ng/v2.18/util-linux-ng-2.18.tar.bz2
tar xf util-linux-ng-2.18.tar.bz2
cd util-linux-ng-2.18
./configure
make

Now follow these steps if you have a 32bit system:

sudo mv /lib/libblkid.so.1.1.0 /lib/libblkid.so.1.1.0.backup
sudo cp shlibs/blkid/src/.libs/libblkid.so.1.1.0 /lib/
sudo chmod 644 /lib/libblkid.so.1.1.0
sudo rm /lib/libblkid.so.1
sudo ln -s /lib/libblkid.so.1.1.0 /lib/libblkid.so.1

or these for 64bit:

sudo mv /lib64/libblkid.so.1.1.0 /lib64/libblkid.so.1.1.0.backup
sudo cp shlibs/blkid/src/.libs/libblkid.so.1.1.0 /lib64/
sudo chmod 644 /lib/libblkid.so.1.1.0
sudo rm /lib/libblkid.so.1
sudo ln -s /lib/libblkid.so.1.1.0 /lib/libblkid.so.1

Now connect your disk or remount it. And you’ll should see your exFAT disk!

Some extra commands:

To format a exFAT partition:
sudo mkfs.exfat -n LABEL /dev/sdXn
or
sudo mkexfatfs -n LABEL /dev/sdXn

To change the label:
sudo exfatlabel /dev/sdXn NEW_LABEL

Get filesystem info:
sudo dumpexfat /dev/sdXn

To check the partition:
sudo fsck.exfat /dev/sdXn
or
sudo exfatfsck /dev/sdXn

Adding ssh-id-copy to OSX !

There’s a very convenient shell script bundled with some distributions of OpenSSH called ssh-copy-id. It seems not to be the case with Leopard’s or Lion’s SSH.
In order to get it, we can simply check it out of a GIT repository. Execute these two commands:

sudo curl 'https://raw.github.com/gist/1639381/eea46277ba544fcbd0a0768e8b3f854880ddb772/ssh-copy-id' -o /usr/bin/ssh-copy-id
sudo chmod +x /usr/bin/ssh-copy-id

Now execute ssh-id-copy like this:

MBP:~ martijn$ ssh-copy-id root@192.168.0.7
Now try logging into the machine, with "ssh 'root@192.168.0.7'", and check in:

~/.ssh/authorized_keys

to make sure we haven't added extra keys that you weren't expecting.

Adding a non-VMFS drive to your ESX(i) server and use it!

I had some spare Windows drives lying around and wanted to put them in my HP MicroServer running ESXi 4.1.

After installing the SATA drive, and rebooting, I tried to simply add the drive in the vSphere console. No love from VMWare — I got the message, “Error while adding drive – disk not available.” Hmmm. I was sure the drive was working.

Turns out that in ESXi, once a disk has been written to, in any format, it won’t initialize.
Here’s what it took to add the drive in:

Low-level formatted the drive (the name of the drive might be shorter or longer):
~ # dd if=/dev/zero of=/vmfs/devices/disks/t10.ATA_ST3500413AS_Z2A3TKQ6 bs=512 conv=notrunc

Try adding the disk to your datastore now; I canceled this command after waiting 5 minutes and noticed that ESXi now saw the disk as a ‘blank disk’. Adding it to my datastore now worked! If not, continue…

Recreate the partition table:
~ # fdisk /vmfs/devices/disks/t10.ATA_ST3500413AS_Z2A3TKQ6

Then ‘o’ to Create a new empty DOS partition table
Then ‘n’ to add a new partition. I used Primary as the type, and 1 as the partition number.
Then ‘t’ to change the type. ‘fb’ is the code for VMFS 3.0
Then ‘w’ to write everything to the drive

Finally, use the ‘vmkfstools’ program to create the volume. I added it as a new datastore using the following command:
~ # vmkfstools -C vmfs3 -S Datastore2 /vmfs/devices/disks/t10.ATA_ST3500413AS_Z2A3TKQ6

As always, YMMV.

Hide your drive from the desktop in OSX

Sometimes you simple need all your drives on your desktop, but the ones like ‘TimeMachine’ or ‘Lion Installer’ can also simple disappear. Use this script to hide them at every reboot, without having to unmount them. Adjust your volume name to reflect yours.

sudo echo "echo \"UUID=$(diskutil info /Volumes/Lion\ Installer/ | grep UUID | awk '{print $3}') none hfs rw,noauto\" >> /etc/fstab" | sudo bash

To see if it has worked:
sudo cat /etc/fstab

Results in:
UUID=F4F6562F-1C4D-361D-BBD4-91C12ED96B44 none hfs rw,noauto

If your /etc/fstab doesn’t show the UUIC, then you need to check the volume name and/or delimit spaces with an \.

Print protected PDF files on OSX – using the terminal

The newer versions of Preview (at least OS X 10.5, and maybe earlier) respect the “do not print without a password” setting in PDF files. However, it is possible to create a completely unprotected version of any PDF file using ghostscript. A command like this should work:

gs -sOutputFile=MyNewFile.pdf -sDEVICE=pdfwrite -dNOPAUSE -dbatch -q MyProtectedFile.pdf

You may need to type “quit” at the command prompt after gs finishes processing the file. Then open the newly created PDF file and voilà, printable!

[solved] OS X 10.7 Lion and mail search not working…

I was stunned to find out that the search function on the Mail.app wasn’t working anymore since I’ve upgraded my Mac from Snow Leopard 10.6.8 to (the very cool) Lion 10.7. Thought it could be Spotlight not working, or something else.

Well, as it turns out, it’s a combination of 2 problems:

1) turn Spotlight indexing on: sudo mdutil -i on /
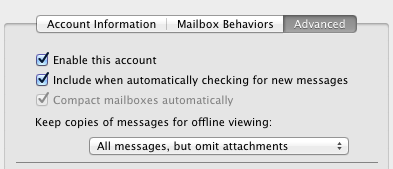
2) when using IMAP, configure your account to Keep a message for viewing offline

That’s it! Where Snow Leopard was able to search thru already downloaded mail (although the above option was enabled), Lion can’t.

Now the search is working great!

Hyves account opzeggen / verwijderen / deleten

Zelf doe ik al helemaal niets meer op Hyves dus werd het tijd om mijn account op te heffen. Grappig genoeg kan je op de site van Hyves.nl hier GEEN informatie over vinden en op honderden sites kom je steeds een niet werkende link tegen.

Wel nu, hier is ie dan; een werkende ‘Verwijder mijn account’-link:

http://hyves.nl/?module=Layout&action=showDel

Klik op ‘Ik neem afscheid’.

Vul je wachtwoord in en klik op ‘Verwijderen’,

Als het goed is ontvang je een bevestigings email.
Klik op de link in die mail, bevestig het verwijderen:

…en klaar is Kees!

Poste Italiane: International shipments price list 2011

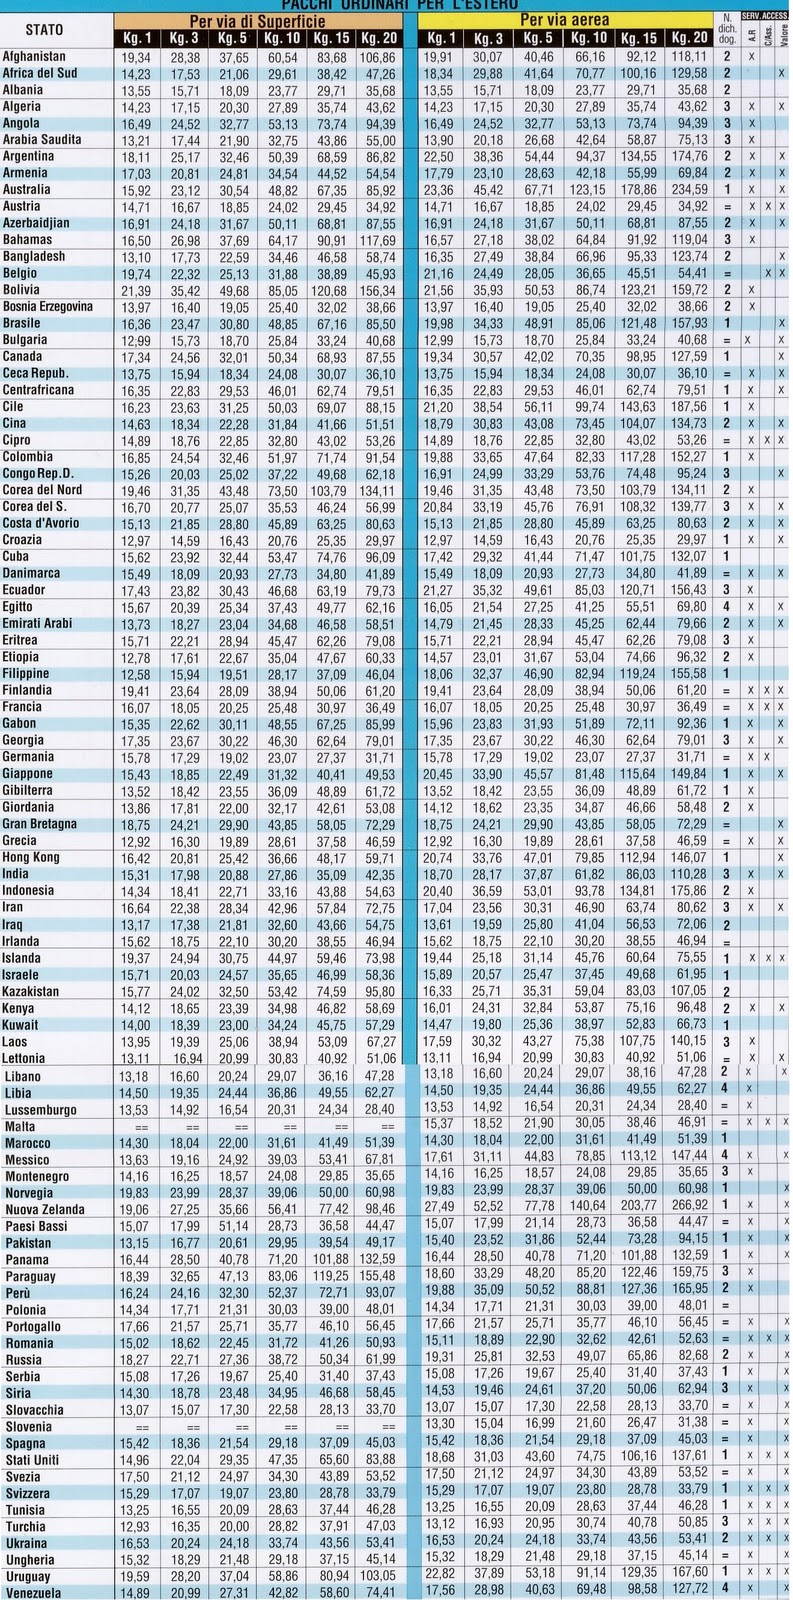
Seems to be it’s impossibile to find out how much the Italian Postal service is charging for a simple shipment of a box outside Italy. In fact, on their site they ONLY show you the more expensive ways (PaccoCelere Internazionale, QuickPak Europe, EMS) but these services have a starting price of € 28 ! There’s NO direct link on their site towards this page: http://www.poste.it/postali/ordinario/estero.shtml

So, if you’re in Italy and you need to ship something, ask for “pacco ordinario per l’estero’. They won’t have any documentation about it and the price will depend on weight, country and if you’ll be using air or ground services.

But how to know what it’ll cost… Well, see the attached image of an internal document of the Poste Italiane! Should be valid from 2011 but your mileage may vary: prices are always subject to change (mostly without notice).