Link your public Dropbox folder to your site

I’ve always got some stuf in my public Dropbox folder I want to share with friends but I don’t want to send out emails with the link to those files.
I thought it would be easier to have link a folder on my webserver to this public Dropbox folder. This is how I did it:

– get your public dropbox folder name; should be something like this:
http://dl.dropbox.com/u/xxxxxxx/
– replace the xxxxxxx with what you see in your dropbox
– create a folder on your webserver, like /dl
– create a .htaccess on your folder with this info:
Redirect 301 /dl http://dl.dropbox.com/u/xxxxxxx

That’s it! It’s a ‘file not found’ redirect towards your Dropbox.

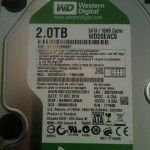
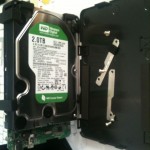
Unboxing the WD 2.0 TB USB disk – WDBAAU0020HBK

Got a couple of external 2.0 TB disks from WD; prices € 65 at amazon. Amazing deal.

But, I wanted to know what’s inside of these boxes. So, I took my trusty putty-knife (the one I use to operate on Mac mini’s) and I opened it up. And this is what’s inside:

Disk: Western Digital Caviar Green WD20EACS 2.0TB with 16MB cache
(update: or you might find a WD20EARS 2.0TB with 64MB cache!)

Model: WD20EACS-11BHUB0

Date: 17/12/2010

Joining partitions in OS X

Eager to take on new challenges, preferebly with live equipment, I decided to reclaim some disk space.

My Ubuntu install on my MacBookPro was sitting there unused for a while now. And with VM’s who needs to dual boot anyway?

So, let’s trash my Ubuntu install. Now joining my ‘windows’ disk to my active partition was a piece of cake. However the linux swap would not budge.

Ofcourse booting from another disk was a solution which is by me considered as a failure not a solution.

Simple solution in the end:

box:~ user$ diskutil list /dev/disk0

/dev/disk0
#:                       TYPE NAME                    SIZE       IDENTIFIER
0:      GUID_partition_scheme                        *320.1 GB   disk0
1:                        EFI                         209.7 MB   disk0s1
2:                  Apple_HFS Inlakesh                309.2 GB   disk0s2
3:                 Linux Swap                         4.1 GB     disk0s3

box:~ user$ diskutil eraseVolume HFS+ oldswap disk0s3

Started erase on disk0s3
Unmounting disk
Erasing
Initialized /dev/rdisk0s3 as a 4 GB HFS Plus volume
Mounting disk
Finished erase on disk0s3 oldswap

box:~ user$ diskutil list /dev/disk0

/dev/disk0
#:                       TYPE NAME                    SIZE       IDENTIFIER
0:      GUID_partition_scheme                        *320.1 GB   disk0
1:                        EFI                         209.7 MB   disk0s1
2:                  Apple_HFS Inlakesh                309.2 GB   disk0s2
3:                  Apple_HFS oldswap                 4.1 GB     disk0s3

box:~ user$ diskutil mergePartitions HFS+ Inlakesh disk0s2 disk0s3

Merging partitions into a new partition
Start partition: disk0s2 Inlakesh
Finish partition: disk0s3 oldswap
Started partitioning on disk0
Merging partitions
Waiting for disks to reappear
Growing disk
Finished partitioning on disk0
/dev/disk0
#:                       TYPE NAME                    SIZE       IDENTIFIER
0:      GUID_partition_scheme                        *320.1 GB   disk0
1:                        EFI                         209.7 MB   disk0s1
2:                  Apple_HFS Inlakesh                319.7 GB   disk0s2

That’s it. Scrapping the uneeded partition (volume in apple diskutil speak) to something diskutil understands, i.e. HFS+, worked like a charm!

Enjoy.

Serial converters on Mac OS X ( USB to RS232 )

Hello All.
Being a network equipment kind of person, there is no way around the console and then. We all know the Prolific 2303 works fine, and now I know that most FTDI converters (on sale at for example the fnac stores) also have excellent drivers for Mac OS X.

So getting a good and cheap cable is not an issue, nor is getting a driver a challenge.

The other bit I’d like to share is the wonderful command line tool called ‘screen’. Now you can do lots of funky stuff with screen, however also use it for accessing your serial port.
It’s as simple as ‘screen /dev/tty.PL2303-XXX 9600‘ or ‘screen /dev/tty.usbserial-XXX 9600‘ et voilà.
To end a screen session the propper way, releasing your serial port again, is done by ‘Ctrl+A‘, followed by ‘:‘ and typing ‘exit‘ and hitting return.
There are plenty of guides out there if you think this is too basic. I just wanted to share that serial console on a mac is easy.

Spedireweb.it: NON funziona!

-UPDATE-

Lascia perdere SpedireWeb; dopo un sacco di problemi (spedizione perse, niente rimborsi, ecc) sono passato a TNT-Click.it che funziona davvero bene.

Visita il sito tnt-click e spedisci con lo sconto

Oggi ho fatto la mia prima prova con www.spedireweb.it; ho compilato i moduli, ho pagato € 6,98 tramite paypal e ho ricevuto subito via mail la bolla da stampare e da applicare sul pacco. Alle fine usano TNT Express per il ritoro e la spedizione: niente male per questo prezzo!

Domani il pacco viene ritirato e dovrebbe arrivare alla destinazione entro 3 giorni. Vediamo!

Aumento tariffe Paccocelere di Poste Italiane

Eccomi qui a fare l’ennesimo post per annunciare l’aumento delle tariffe postali del “pacco celere” che è operativo dal 24 agosto scorso e che, ovviamente, è avvenuto in sordina, senza nessun avviso per gli utenti.

Per chi vende online o per chi partecipa a swap, baratti, scambi e simili (come me) è l’ennesimo salasso ingiustificato, ingiustificato perché essenzialmente la qualità dei servizi postali nazionali peggiora invece di migliorare, malgrado gli aumenti costanti e abbondanti!
Stessa cosa per chi ama comprare online (come me ancora una volta) che si vedrà addebitate spese di spedizione ancora più care.

Per calcolare l’aumento basta aggiungere il costo dell’IVA al 20% ai prezzi del paccocelere, quindi la postacelere 1 passa da 10 a 12,00 euro, mentre il pacco celere 3 passa da 9,50 a 11,40 euro (quasi quasi conviene di più il primo tanto per 60 centesimi di differenza…) e il pacco celere 1 (da 0 a 3kg.) passa da 13,00 a 15,60 euro!

Però una buona notizia c’è, sono venuta a conoscenza di un nuovo servizio privato, per spedire in Italia, che ha costi un po’ inferiori, devo solo provarlo e poi preparo una bella recensione a “blog unificati”… Si chiama www.spedireweb.it.

How to install language support for Ubuntu

How to install language support for Ubutnu:

If you want to add additional locales on your Ubuntu installation, check this out!  Go to the locales folder:

$ cd /usr/share/locales

In that directory is a script to add a new locale or language pack.  If you want to find out which language pack to install you can look at the /etc/locale.alias file.  To install, for examples,  Italian language support on Ubuntu, just run this command:

$ ./install-language-pack it_IT

Followed by:

$ dpkg-reconfigure locales

That’s it! Repeat these steps for any other locale you need.

Disable service startup in linux

My eTrayz NAS starts up with lots of services that I don’t need, like iTunes-server (mt-daapd), MiniDLNA, etc.
I put together this little script do easily check the current runlevel services and to disable them. Nothing spectacular but still 🙂

#!/bin/sh
chkconfig --list | grep "3:on"

echo "Enter service name:"
read service

echo "Removing $service"
chkconfig --del $service
for i in 1 2 3 4 5 6; do
chkconfig --level $i $service off
echo "Service $service in runlevel $i turned off."
done
chkconfig --list | grep -i $service